Section 11: Authentication Data Management
This section outlines the process for managing authentication for editor.html. It includes generating a read-only token for secure operations and retrieving the API base path for Studio engine API calls.
Objectives
- Generate a read-only token to for Studio engine to safely access media and fonts.
- Provide the API base path for API calls within the application environment.
1. Retrieve Authentication Data
The /user/authdata endpoint serves dual functions:
- It returns a read-only token used for accessing media and font resources.
- It provides the environment-specific API base path required for API operations.
This functionality is essential for the Studio engine's safe operation. Below is the implementation of the endpoint in server.js:
app.get("/user/authdata", async (context) => {
  const userType = getUserType(context);

  if (userType == "unauth") {
    return context.text("Unauthorized", 401);
  }

  const readonlyToken = await getReadonlyToken(db);

  return context.json({success:true, token: readonlyToken, apiURL: `${baseURL}/grafx/api/v1/environment/${environment}/`});

});
Warning
Ensure that only the readonly token is returned. Distributing a "dangerous" token with full permissions could allow malicious actors to compromise the system.
2. Implementation of the Readonly Token
Up to this point, we have utilized a token with full permissions, which we will refer to as the "dangerous" token. Now we need a read-only token for safely loading the Studio engine.
Creating reating a read-only token involves three steps:
Step 1: Creating an Integration
Follow the instructions in the integration guide to create an integration.
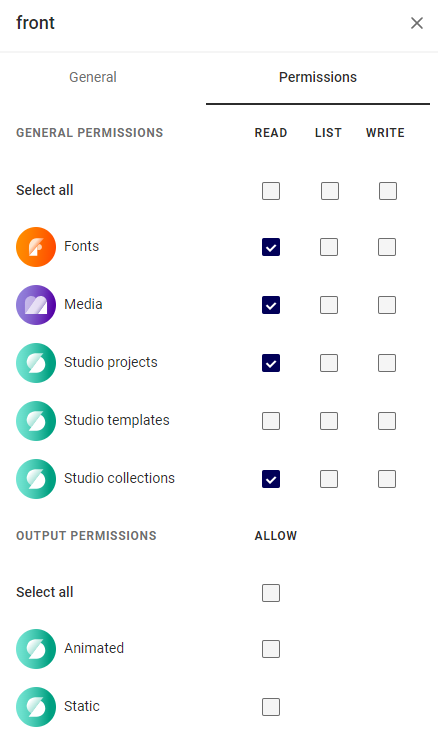
Make sure to set limited permissions:
How does this Integration interact with our new Project?
This Integration is like all other users and thus it cannot access Projects that belong to other users. When the Studio engine loads, we will load a standalone JSON file, eliminating the need for the integration to interact with other user Projects.
Proceed to obtain your client ID and secret after setting the correct read-only permissions.
2. Update the Environment Configuration
Amend your .env file to include the newly obtained client ID and secret, designated as FRONT_ID and FRONT_SECRET for front-end usage.
SERVER_ID = "GqPbqZD8u2QQDsBMXFY2fmeQQsfYvX1J"
SERVER_SECRET = "o-qqz-Q2vAFLWUUiZs4keQQQCtyTgCa0Uzh-1ffkMM3q72j-Vqqq6Ekr4k8IlT9"
BASEURL = "https://example.chili-publish.online"
ENVIRONMENT = "example"
FRONT_ID = "82CqqZEBlrFgTfhQDLafiJKjqqq8qLf"
FRONT_SECRET = "b33qBT6vV9RXwFA_D0l9LqqT2fGUMvtPx22M-_3YVdOw10EK2rQQqQqu5Dq41zs"
Note
Replace the placeholders with the actual values you have generated.
3. Create getReadonlyToken Function
Create a function in utility.js named getReadonlyToken by following the structure of the existing getDangerousToken function:
export async function getReadonlyToken(db) {
  const {readonly, dangerous} = db.getTokens();

  const now = new Date();

  if (now.getTime() > readonly.expires) {
    const {access_token, expires_in} = await getToken({id:process.env["FRONT_ID"], secret:process.env["FRONT_SECRET"]});

    db.setReadonlyToken(access_token,expires_in);

    return access_token;
  }

  return readonly.value;
}
Exercise extreme caution to avoid confusion with the environment variables or using the wrong database properties (dangerous instead of readonly).
Dangerous
Tokens with extensive permissions that are inadvertently exposed cannot be revoked. In such cases, the only recourse is to wait for the token to expire.
3. Import getReadonlyToken
Finally, ensure that the getReadonlyToken function is imported into your server.js file for proper usage: